Understanding Surface Roughness in CNC Machining
Author: SAIVS Date Published: Jun 03,2024
Surface roughness refers to how tiny the ups and downs are on a surface. In other words, it's a measure of how smooth a surface is on a microscopic level.
Imagine zooming in really close to a surface. If it looks very smooth, with barely any bumps or dips, that's a low surface roughness. On the other hand, if you see a lot of peaks and valleys, that's a high surface roughness.
Surface roughness is important in CNC machining because it affects how a part functions. For example, a smoother surface (low roughness) might be better for parts that slide against each other to reduce friction. But a rougher surface (high roughness) might be better for gripping another part.
Measurement of Surface Roughness
Units of Measurement
Surface roughness is commonly measured using the parameter "Ra," which stands for Roughness Average. Ra is typically expressed in micrometres (µm) or micro-inches (µ-in).
Surface Roughness Parameters
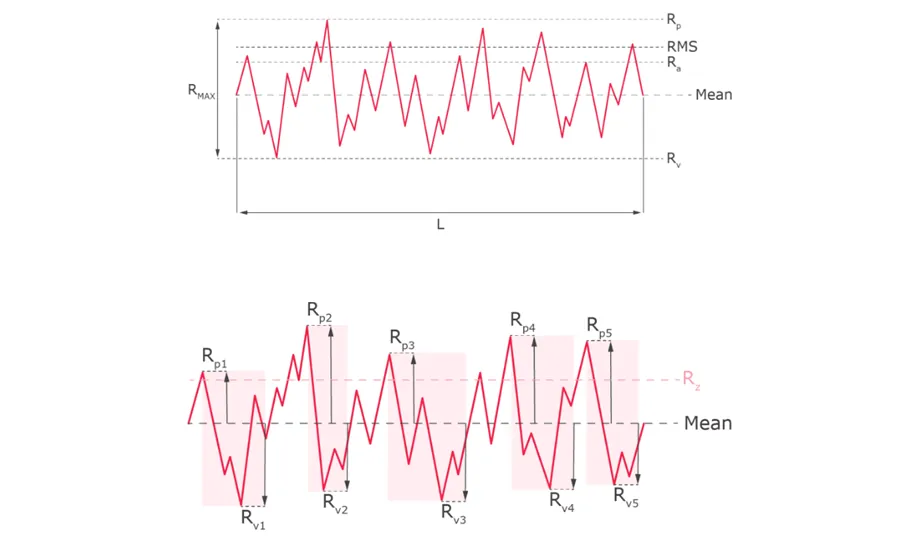
Ra (Average Roughness): The arithmetic mean of the absolute values of the surface height deviations from the mean line.
Rz (Average Maximum Height): The average of the absolute values of the five highest peaks and the five lowest valleys over the evaluation length.
Rp (Maximum Peak Height): The height of the highest peak from the mean line within the evaluation length.
Rv (Maximum Valley Depth): The depth of the deepest valley from the mean line within the evaluation length.
Rmax (Maximum Roughness Depth): The largest single peak-to-valley measurement within the evaluation length.
RMS (Root Mean Square): The root mean square average of profile height deviations from the mean line within the evaluation length.
Understanding Common Roughness Options (Ra)
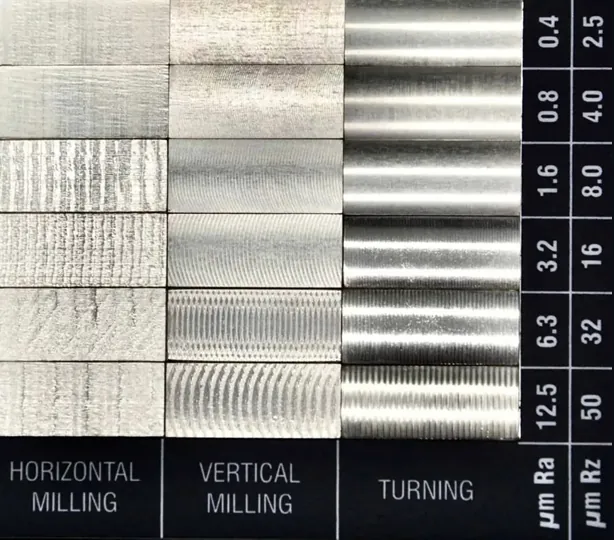
This breakdown explains the different levels of surface roughness, measured in Ra (average roughness) and micrometers (μm), commonly used in machining. Ra indicates how much the surface deviates from a perfect plane. Lower Ra values represent smoother surfaces.
Here's a closer look at each option:
Ra 3.2 μm (default): This is the most common and economical option. It leaves visible tool marks on the surface but is suitable for parts that experience vibrations, heavy loads, or stress. Think of it as a good all-rounder for many applications.
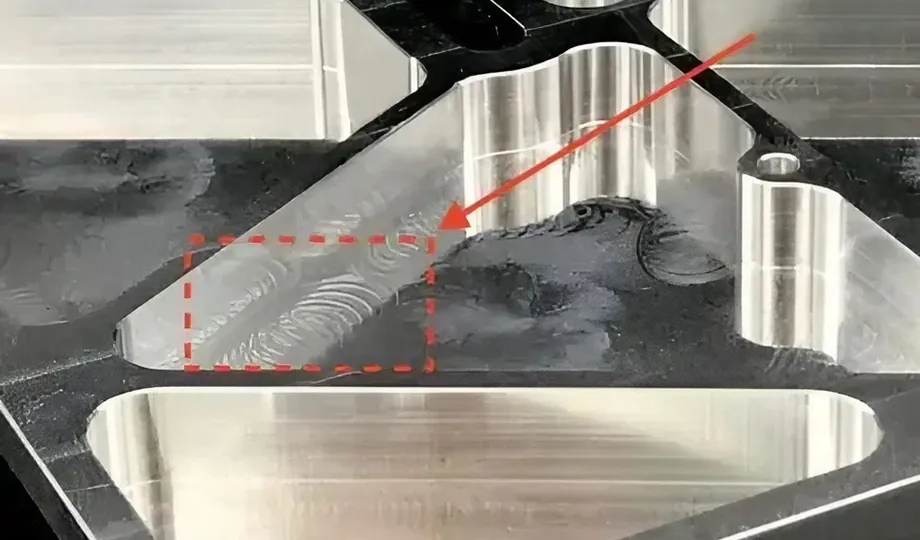
Ra 1.6 μm: This provides a good balance between cost and finish. The surface will have slightly less noticeable tool marks compared to Ra 3.2 μm. It's ideal for parts with lighter loads or slow movements. Expect a slight increase in cost (around 5%) compared to the default option.
Ra 0.8 μm: This is a high-quality finish achieved through more precise machining. The surface will be noticeably smoother with minimal tool marks. This is suitable for parts requiring tight tolerances, light loads, or infrequent movement. The cost increases by around 10% compared to Ra 1.6 μm.
Ra 0.4 μm (highest): This represents the smoothest possible finish achievable through techniques like diamond polishing or grinding. The surface will be extremely smooth, making it ideal for applications like bearings or medical implants where friction needs to be minimized. Expect the highest cost increase (around 15%) compared to Ra 1.6 μm.
Choosing the Right Roughness:
The best Ra value for your project depends on various factors:
Functionality: Consider the loads, stress, and movement the part will experience. Ra 3.2 μm might be sufficient for a vibration-prone bracket, while Ra 0.4 μm is crucial for a bearing.
Cost: Smoother finishes require more precise machining, increasing the cost. Balance your needs with budget constraints.
Aesthetics: If appearance matters, a smoother finish might be desirable.
Remember: Ra is just one aspect of surface texture. Other factors like directionality of tool marks might also be important for your application. Discuss your specific requirements with your machinist to determine the optimal surface roughness for your project.
Factors affecting Surface roughness
1. Machining Parameters:
Cutting Speed: Higher speeds can result in smoother surfaces, but they can also generate more heat, potentially causing unwanted effects.
Feed Rate: Slower feed rates create finer finishes, while faster rates leave a rougher surface.
Depth of Cut: Shallower cuts generally produce smoother surfaces compared to deeper cuts that remove more material at once.
2. Cutting Tool Parameters:
Tool Wear: A dull tool will leave a rougher surface compared to a sharp one. Maintaining sharp tools is crucial for good surface finish.
Tool Geometry: The shape and angle of the cutting tool can influence the surface finish. Different geometries are designed for specific applications.
Tool Material: The material of the cutting tool can also play a role. Harder tool materials generally produce smoother finishes.
3. Machine Tool/Fixturing Factors:
Machine Tool Rigidity: A rigid machine tool with minimal vibration will help achieve a smoother surface finish.
Workpiece Clamping: Securely clamping the workpiece minimizes movement during machining, leading to a better surface finish.
Cutting Fluids/Lubricants: Using appropriate cutting fluids can reduce friction and heat, improving surface quality.
4. Workpiece Material Properties:
Hardness: Harder materials can be more challenging to machine smoothly compared to softer materials.
Ductility: Ductile materials tend to deform during machining, which can affect surface roughness.
Grain Size: Finer grain sizes in the workpiece material can lead to smoother finishes.
FAQs
What are common surface roughness standards?
Common standards include 3.2 µm Ra for general purposes, 1.6 µm Ra for smoother finishes, 0.8 µm Ra for high smoothness, and 0.4 µm Ra for precision components.
How does surface roughness affect CNC machining?
Surface roughness influences machined parts' interaction with other components, affecting friction, wear, and overall performance.
What are the types of surface finishes?
Types of surface finishes include as-machined, smooth, textured, mirror, and anodized finishes, each suited for different applications and aesthetic requirements.
Conclusion
Surface roughness is a critical factor in machining and manufacturing, affecting components' performance, durability, and aesthetics. Understanding how to measure, achieve, and apply different levels of roughness can help manufacturers produce High-quality parts tailored to specific applications. By balancing the desired finish with cost considerations, manufacturers can optimize their processes to deliver reliable and functional products.
Why Choose SAIVS™ as Your Supplier?
1.Superb Quality Control Management
At SAIVS, we take pride in our perfect quality management systems and procedures, which guarantees the excellent performance of all our producs, being a professional Investment Casting | Die Casting| Sand Castingmanufacturer in China.
2.Rich Production Experience
With 20 years of experience in production, SAIVS has a deep understanding of the market and trends, and strives for continuous research and innovation. This has created advantages in both the product's performance and appearance.
3.Competitive Prices
As a Chinese factory committed to becoming the most cost-effective Investment Casting | Die Casting| Sand Castingexporter in China, SAIVS provides high-quality products at advantageous prices. By lowering costs and increasing efficiency, we ensure that our customers receive the best possible value for their investment.
4.Perfect After-sales Service
At SAIVS, we strive to provide superior customer service that meets and exceeds expectations. We are always available for any questions or concerns you may have, and we stand by our commitment to providing excellent after-sales support.
Related Posts
-
Technical Requirements for Investment Casting
Throughout the production process, precision casting solidifies its liquid immediately at room temperature and pours the compound into its unique die casting di...
-
Aluminum: A Versatile Metal with a Duality in Spelling
Aluminum is a versatile metal with a wide range of applications. This article will discuss the history of aluminum, its properties, and its applications.
-
Die Casting Temperature Control: Improve Casting Quality and Production Efficiency
Die casting mold temperature affects casting quality and productivity. Learn how to control temperature for optimal casting.
-
The Mechanical Property Of Stainless Steel Precisoin Casting Is Higher Than That Of Cast Iron
The mechanical property of stainless steel precision casting is higher than that of cast iron, but its casting property is worse than that of cast iron. It has ...
-
The Application of Rapid Prototyping Technology in Investment Casting
Rapid Prototyping (RP) technology, developed in the 1990s, has revolutionized the manufacturing industry by enabling the quick transformation of design con
-
Investment casting: a comparison between stainless steel and aluminum
Investment casting is a widely used manufacturing process that allows the production of complex and intricate metal components with high dimensional accuracy. W...

